
Use the Administrator Validation and Login Settings screen to edit global and language values for the training system.
To access the Administrator Validation and Login Settings screen, click the Validation/Login button on the Administrator toolbar:
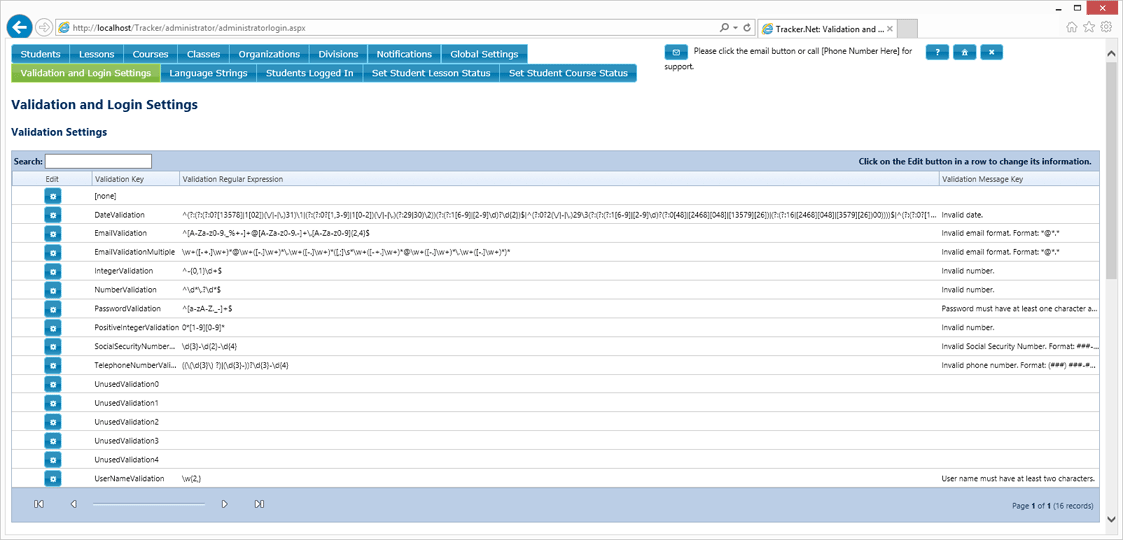
Use the top portion of the Validation and Login Settings screen to edit validation expressions. These verify that entries on the New Student Login , My Information, and Administrator Students screens are in the desired format. You can associate these settings with particular student data at the bottom of this screen. Validation settings consist of a regular expression and a language key for the message to display when the user's entry does not meet the validation conditions. For help in building regular expressions, you might want to visit as site like regexlib.com. To edit any of the values associated with the message keys, go to the Language Strings screen. You are not allowed to add additional validation keys, but there are several unused ones that you can customize for your purpose.
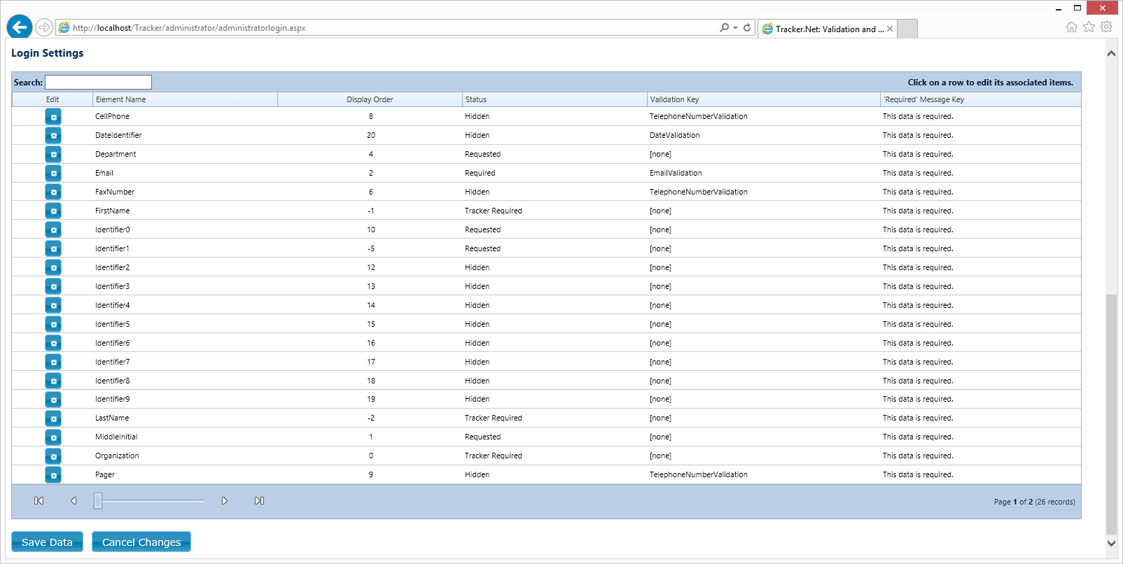
Use the grid in the bottom portion of the Validation and Login Settings screen to specify what elements to request at login and display in reports as well as how they should be configured (see Configuration Details below). You can change the title and the tooltip of data elements on the Language Strings screen.
To edit a login or validation element, click the edit button ( ) in the row for that element. See Editing Administrator Grid Rows for additional details.
After making any changes in either grid, you must either Save Data or Cancel Changes before you can go to another Administrator screen.
You can click on a column heading to sort by that column. To search for content, start typing in the search box at the far left of the screen:

You may need to use the horizontal scroll bars on the browser window to see the search box. The grid will update with matching results as you type.
If the grid has multiple "pages" of data, use the paging controls shown below to just to the first, previous, next, or last page of data.

The number of items per page is controlled by the Default Grid Size on the Global Settings screen.
The following settings are available for each login element in the grid.
| Setting | Description |
|---|---|
| 'Required' Message Key | This is the key for the "is required" text that will display beside a Required element (see Status below) on the New Student Login, My Information, and Administrator Studentsscreens if users attempt to submit their data without entering a value for the element. You can edit the text of the message on the Language Strings screen. |
| Display Order | If the login element is configured to appear (see Status below),
the Display Order specifies its order of appearance on the New
Student Login, My Information, and Administrator screens as
well as in various reports.
The Display Order will normally be an integer greater than 0. Zero and negative values are normally reserved for Tracker Required elements (see Status below). However, if you would like to change the display order in reports, you can re-order the Tracker Required and other elements as well. But be sure that you don't go lower than -5 and that you test thoroughly afterwards. |
| Element Name | This is the key for the data element. It cannot be edited. |
| Status | Use the Status value to specify whether or not the element should
appear on the New Student Login, My Information, and
Administrator screens as well as in various reports, and whether or not it is
required to have a value before the student can log in.
There are four Status values: Requested, Required, Hidden, and Tracker Required. Requested indicates that the element is requested on the New Student Login screen and that it will appear on reports. However it is optional, i.e., a new student need not complete it in order to log in. Required indicates that the value is required on the New Student Login, My Information, and Administrator Students screens and it will appear on reports. A new student cannot log in without entering a valid value for Required elements. Hidden indicates the element will not appear on any screens or reports. Tracker Required is a reserved status. You cannot assign the Tracker Required status to an element or remove it when it is already assigned. |
| Validation Key | This is a key to the desired validation expression for the data element. You can edit the validation expressions at the top of this screen. If you do not need the element to be validated, select [none]. |
This screen is not available to Administrators with 'Supervisor Only' or 'All Levels (Basic)' access.