
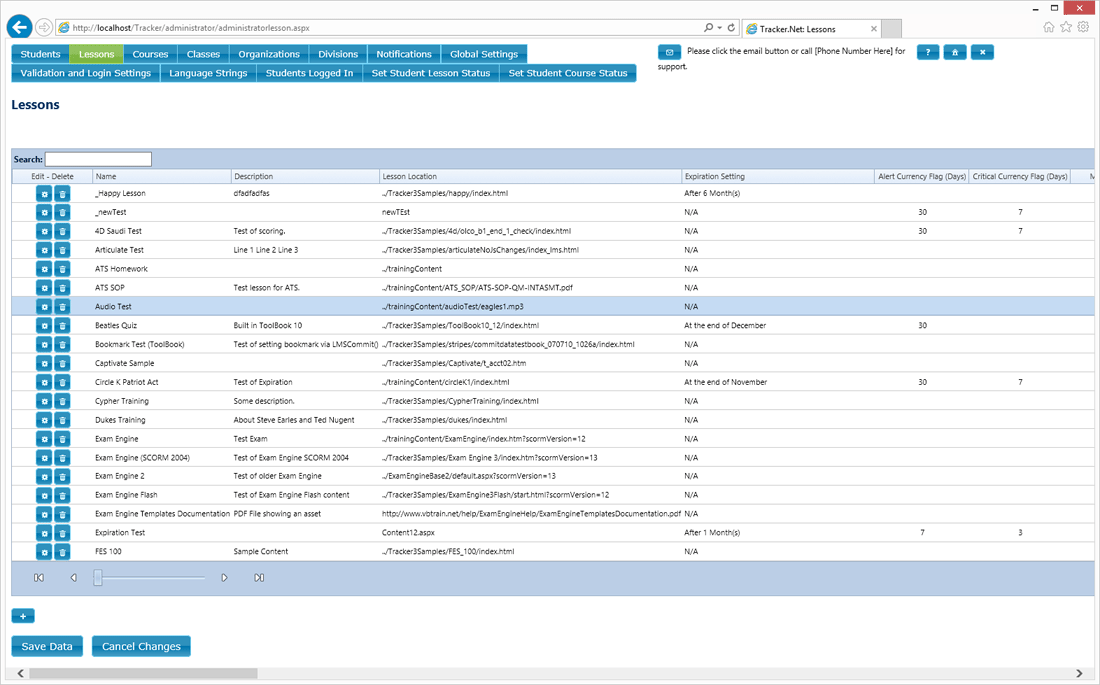
Use the Administrator Lessons screen to add, edit, or delete lessons in the training system.
To add a lesson, select the Add Lesson button from beneath the main grid:
To edit a lesson, click the edit button ( ) in the row for that lesson. See Editing Administrator Grid Rows for additional details.
To delete a lesson, click the delete button ( ) in the row for that lesson. You will be asked to confirm before the deletion occurs.
After making any changes in the grid, you must either Save Data or Cancel Changes before you can go to another Administrator screen.
You can click on a column heading to sort by that column. Searching for content depends on the how searching/filtering is configured. See Searching Administrator Grids for more details.
If the grid has multiple "pages" of data, use the paging controls shown below to just to the first, previous, next, or last page of data.

The number of items per page is controlled by the Default Grid Size on the "Default Settings" tab of the Global Settings screen.
To access the Administrator Lessons screen, click the Lessons button on the Administrator toolbar:

| Column Name | Explanation |
|---|---|
| Alert Currency Flag (Days) | This is the number of days prior to expiration that a lesson moves into Alertstatus. It must be great than the Critical Currency Flag (Days) or no value at all. |
| Body Text | This is the text of any notification emails. Whatever you enter here is appended to the default "Tracker Body" that you can set using the "Tracker_Notification_label" key on the Language Strings page. |
| CEU Accreditation Information | This is optional "Continuing Education Unit" accreditation information that can be displayed on Lesson Certificates. This might include the organization doing the accreditation. |
| CEU Credit Type | This is optional "Continuing Education Unit" information that can be displayed on Lesson Certificates. This might include the type of credit such as CE or CLE. |
| CEU Credit Value | This is optional "Continuing Education Unit" information that can be displayed on Lesson Certificates. This might include the number of hours credit. |
| Close Lesson Window Automatically | Set this value to True if you want Tracker.Net to attempt to close the lesson window at the end of the lesson. Tracker may be unable to do this for all browsers. This is only relevant if the "Use Frame for Lessons on My Courses Screen" on the My Courses tab of the Global Settings screen is set to False. |
| Comments for Students | This is optional information that can be requested by a particular lesson via the "cmi.comments_from_lms" SCORM 1.2 call. This value has various sub-elements in SCORM 2004 is not settable via the Administrator. |
| Completion Threshold | This is a SCORM 2004 element that can set to any value between 0 and 1. If cmi.progress_measure is set by the lesson, Tracker.Net will determine completion status by comparing the completion threshold (cmi.completion_threshold) to the cmi.progress_measure. |
| Critical Currency Flag (Days) | This is the number of days prior to expiration that a lesson moves into Critical status. It must be less than the Alert Currency Flag (Days) or no value at all. |
| Default Lesson Mode | This is a SCORM setting that may be used by an individual lesson via the "cmi.core.lesson_mode" (SCORM 1.2) or "cmi.mode" (SCORM 2004) call. The choices are "Browse," "Normal," "Review," and "Use Course Value." This latter value means that the setting is dictated by the "Lesson Mode" setting on the Courses screen. |
| Description | This description is displayed on various reports but it otherwise not used in the program. |
| Do Not Read Bookmark | Set this value to True if you always want your lesson to start at the beginning. You might also set this to true for a limited period of time to avoid errors with ToolBook and other authoring software if you have updated the lesson and old bookmarks might cause an error. |
| Do Not Write Bookmark | Set this value to True if you want to avoid writing a bookmark. You might do this if you always want the user to start at the beginning. You might set Do Not Read Bookmark to True and leave this value as False if you want to update bookmarks before turning on reading them again to avoid possible errors with ToolBook and other authoring software after updating a lesson. |
| Do Not Read Suspend Data | Set this value to True if you do not want to read the "suspend" data from a previous session. Suspend data is often used to restore question values, determine what pages have been visited, and anything else needed by the lesson. For lessons with lots of questions, reading this data can noticeably prolong the startup time. You might set this value to True if you want any questions to be started over and don't need anything within the suspend data. You might also set this to true for a limited period of time to avoid errors with ToolBook and other authoring software if you have updated the lesson and old suspend data might cause an error. |
| Do Not Write Suspend Data | Set this value to True if you do not want to write the "suspend" data when exiting a lesson. Suspend data is often used to restore question values, determine what pages have been visited, and anything else needed by the lesson. For lessons with lots of questions, writing this data can noticeably prolong the time it takes a lesson to close. You might set this value to True if you want any questions to be started over and don't need anything within the suspend data. You might set Do Not Read Suspend Data to True and leave this value as False if you want to update suspend data before turning on reading it again to avoid possible errors with ToolBook and other authoring software after updating a lesson. |
| End Access After Completion | Set this value to True if you want to disallow access to the lesson once it has been completed or passed. |
| Exclude Interaction Data | Set this value to True if you don't want Tracker.Net to store interaction (question) data for this lesson. You might do this if you are only interested in the overall score. |
| Expiration Setting | The setting determines whether the lesson expires some time after it is
completed. For example, there may be a recurring training requirement where the
lesson must be completed every year. You can choose not to have an expiration,
have the lesson expire at the end of the current calendar year, have it expire
at the end of a particular month (the following June for example), or after a
fixed number of days, weeks, months, or years.
The "clock" on expiration normally starts when the student completes or passes the lesson. However, there is an additional Expiration Constraint that can be set to either the Latest Lesson Date or the Lesson Anniversary Date. The Latest Lesson Date means that Tracker.Net compares today's date to the current expiration date for the lesson and uses whichever is later. This is designed for the regulatory situation where the expiration can be extended from the date of the previous expiration rather than from the date the training is completed. The Lesson Anniversary Date means that expiration is calculated from a specific date set for each student on the Students screen. This could be a birthday, the date the student entered the company, or another value. Expiration is then calculated from that date. For example, if the anniversary date is November 15, 1962, the current date is October 15, 2011, and the expiration setting is one year, then the new expiration date will be November 15, 2012. The Alert Currency Flag (Days) setting is used to determine whether to increment the year. In the previous example, the first calculated expiration date would be November 15, 2011. Tracker checks to see if that date is in the past. If so, it increments the year. It then checks to see if the date is within the number of alert days of the current date. In this example, the first expiration date is 30 days later than the current date. With a typical alert days of 90, this means that Tracker will increment the year to the final value of November 15, 2012. Similarly, the Alert Currency Flag (Days) setting is used if expiration is at the end of a particular month. For example, if training is set to expire at the end of December, the alert days is 30, and the student completes the lesson on December 10, the training will expire the following December. However, if the same student takes the training on November 10, the training will expire THIS December. Each time a student completes a lesson, its expiration date is recalculated. If you want to have the lesson hidden once it is completed until it moves into Alert status, use the Hide After Completion Until Alert setting. |
| For Credit | This is a SCORM setting that may be used by an individual lesson via the "cmi.core.credit" (SCORM 1.2) or "cmi.credit" (SCORM 2004) call. The choices are "Credit," "No Credit," and "Use Course Value." This latter value means that the setting is dictated by the "For Credit" setting on the Courses screen. |
| Hide After Completion Until Alert | Check this option if the lesson should be hidden for the student between the time that it is completed and the lesson moves into the Alertstatus. This setting is only applicable when the lesson is configured with an expiration setting. Its intent is to meet regulatory requirements for recurring training where the student should not be able to re-take the training until the appropriate window before expiration of the training. If all lessons in a course are hidden due to completion, the course containing the lessons is also hidden. |
| Inactive | Set this to True if you want the lesson to be maintained in the database but made inactive. In that case, the lesson will no longer show up in the My Courses screen or any reports. You might set a lesson to be inactive if you want to maintain student data for the lesson but no longer want it to be listed. |
| Launch Data | This is a SCORM setting that may be used by an individual lesson via the "cmi.launch_data" call. |
| Lesson Location | Enter the relative (../trackersamples/yourcontent/yourcontent.html for example) or complete URL (http://www.yourserver.com/trackersamples/yourcontent/yourcontent.html). Note that the content for SCO SCO Types and Tracker.Net must be on the same domain for JavaScript security reasons. If you are creating and Audio or Video lesson, point to the location of the audio or video file. If you have "Add Multiple HTML 5 Media Sources" checked on the My Courses tab of the Global Settings screen, be sure to include the other audio types (.mp3 and .oga) or video types (.mp4, .webm, .ogv, and .wmv) with the same base name as the file listed. |
| Lock Lesson Status After Completion | Set this value to True if you don't want subsequent entries into the lesson by a student to set the lesson back to incomplete, failed, or unknown once the student has successfully passed or completed the lesson. This overrides the default SCORM behavior where the lesson sets the lesson status. |
| Make Window Resizable | Set this value to True if you want the student to be able to resize the lesson window. This is only relevant if the "Use Frame for Lessons on My Courses Screen" on the My Courses tab of the Global Settings screen is set to False. |
| Mastery Score | This is a SCORM setting that may be used by an individual lesson via the "cmi.student_data.mastery_score" (SCORM 1.2) call. This element has been replaced by "cmi.scaled_passing_score" in SCORM 2004. For a 2004 lesson, you should set the Scaled Passing Score instead. |
| Max Time Allowed (HHHH:MM:SS.SS) | This is a SCORM setting that may be used by an individual lesson via the "cmi.student_data.max_time_allowed" (SCORM 1.2) or "cmi.max_time_allowed" (SCORM 2004) call. In SCORM 2004, Tracker.Net will provide this value in "timeinterval" format. However, entry via the Administrator is in HHHH:MM:SS.SS for compatibility with SCORM 1.2 lessons. |
| Maximum Number of Lesson Attempts | If you want to limit access to the lesson to a defined number of attempts, set that value here. |
| Name | This is the name given to the lesson . |
| Notify Email List | A comma-delimited list of email addresses to receive the notification message. Spaces between addresses are permitted but not required. |
| Notify When Attempted | Set this to true to have a notification email sent to the address(es) listed in the Notify Email List column whenever this particular lesson is attempted. |
| Notify When Completed | Set this to true to have a notification email sent to the address(es) listed in the Notify Email List column whenever this particular course is completed. To have a notification email sent whenever any lesson is completed, use the Notification Settingsscreen. |
| Notify When Failed | Set this to true to have a notification email sent to the address(es) listed in the Notify Email List column whenever this particular course is failed. To have a notification email sent whenever any lesson is completed, use the Notification Settings screen. |
| Reply Email Address | This is the "reply to" email address used for any "Notify When Completed" emails sent for this course. |
| SCO Type | Choose whether the lesson is a SCO (Sharable Content Object), an Asset, an Audio file, a Video file, a Book or Periodical, Classroom Training, On the Job Training, or Other Offline Content.
An Asset is a piece of content that does not send any SCORM runtime messages and is therefore marked as complete upon launch. A PDF document or standard web page would be examples of Assets. For Audio and Video files, Tracker.Net handles all the SCORM 1.2 calls (you can edit audiovideo.js to use SCORM 2004 instead). It marks the lesson as completed automatically and also tracks the time spent with the lesson open. If you are creating and Audio or Video lesson, point to the location of the audio or video file in the Lesson Location. If you have "Add Multiple HTML 5 Media Sources" checked on the My Courses tab of the Global Settings screen, be sure to include the other audio types (.mp3 and .oga) or video types (.mp4, .webm, .ogv, and .wmv) with the same base name as the file listed. The remaining choices are all examples of lessons that cannot be launched from Tracker.Net but can still be included as part of courses. You can set status and other information for these lessons (along with SCO's and Assets) on the Set Student Lesson Status screen. You can control whether offline lessons show up on the My Courses screen with the Include Offline Lessons on the My Courses Screen setting on the Global Settings screen. |
| Scaled Passing Score | This is a SCORM setting that may be used by an individual lesson via the "cmi.scaled_passing_score" (SCORM 2004) call. It must be blank or a value between -1 and 1. This element is not used in SCORM 1.2. Instead, that version uses "cmi.student_data.mastery_score" and its corresponding Administrator setting, Mastery Score. |
| Show Menubar | Set this value to True if you want the lesson window to have a menubar. This is only relevant if the "Use Frame for Lessons on My Courses Screen" on the My Courses tab of the Global Settings screen is set to False. |
| Show Scrollbars | Set this value to True if you want the lesson window to have scrollbars. This is only relevant if the "Use Frame for Lessons on My Courses Screen" on the My Courses tab of the Global Settings screen is set to False. |
| Show Status Bar | Set this value to True if you want the lesson window to have a status bar. This is only relevant if the "Use Frame for Lessons on My Courses Screen" on the My Courses tab of the Global Settings screen is set to False. |
| Show Toolbar | Set this value to True if you want the lesson window to have a toolbar. This is only relevant if the "Use Frame for Lessons on My Courses Screen" on the My Courses tab of the Global Settings screen is set to False. |
| Time Limit Action | This is a SCORM setting that may be used by an individual lesson via the "cmi.student_data.time_limit_action" (SCORM 1.2) or "cmi.time_limit_action" (SCORM 2004) call. |
| Use CEU Certificate | Check this box (set it to True) in order to use the "Continuing Education Unit" certificate for Lesson Certificates rather than the normal certificate. In this case, you typically want to enter the CEU Accreditation Information, CEU Credit Type, and CEU Credit Value. |
| Window Height (Pixels) | This is the desired height of the lesson window. A common value would be 600 for an 800 x 600 (SVGA) resolution. |
| Window Left Location (Pixels) | This is the left (X) position of the lesson window. If it is not set, then 0 is used. |
| Window Top Location (Pixels) | This is the top (Y) position of the lesson window. If it is not set, then 0 is used. |
| Window Width (Pixels) | This is the desired width of the lesson window. A common value would be 800 for an 800 x 600 (SVGA) resolution. |
This screen is not available to Administrators with 'Supervisor Only' or 'All Levels (Basic)' access.